Showing posts with label Tablescape. Show all posts

Thursday, September 20, 2012

Lee County Farm City Committee Meeting


I was so excited to not only have the honor of being appointed to this committee, but to prepare breakfast for the members at this week's meeting. The purpose of our group is to highlight the important contribution farmers make to the local economy. Agriculture and farming have far reaching effects that touch all facets of our economy including schools, government, business and industry. The events planned for the coming weeks will give citizens of all ages opportunities to take a sneak peak at initiatives and farming practices of both yesterday and today.

Here is my GLUTEN FREE  menu:


Wednesday, August 8, 2012

Gluten Free Luncheon for Four

Preparing lunch--a gluten free lunch--for old friends doesn't require days of preparation. 
Sometimes less is more, especially when you are short on time,, but long on determintion to make your guests feel special. 
Here is my table:

Table for four for lunch.

Individual place setting.
Look at the wine glass


Here is what I did: 

I chose a basic color scheme that match the predominate colors in my dining room--good and burgandy. A silk burgandy topper provided an unobtrusive backdrop to my other table appointments. I chose rustic placemats turned the narrow way, allowing about two to three inches flow over the side of the table. Mixing textures provides interest and draws the eye into the arrangement. 

For tableware, I chose to use my modern square plates with my dinner plate serving as a charger for the smaller plates to come. Tall gold and burgandy wine glasses made perfect partners that became home for the gold and burgandy napkins. Dessert plates placed under the wine glasses highlighted the gold color of the stem that would have been lost on a dark 1860's handcarved oak table. 

By planning a menu that can be made ahead of time and then a few final touches and you are to welcome you guest leaves you rested to enjoy your visit. 

Here is my menu:
 Citrus Fruit Cup (click for link to recipe)
with Rosemary Infused Syrup
Shrimp Salad Stuffed Tomato (click for link to recipe)
Stuffed Endive Salad (click for link to recipe)
Avocado Wedges
Brazilian Cheese Bread (click for link to recipe)
Chardonay
 Coconut Berry Tart (click link for recipe)

Tuesday, July 24, 2012

Steak Dinner with Friends--the Table


Getting together with friends is always special, but sometimes more so than others. This past week marked the second anniversary of my husband's pacemaker, plus it gave me an opportunity to say a culinary "thank you" to six of the most awesome folks in the world who look out for Rick's dietary constraints with the same care that I do. Not many people can truthfully say that. So, I am sharing with you the backdrop for this fun, casual evening with really good friends.
Silver chargers placed at right angles make for an interesting setting!
My white hemstitched tablecloth provided the perfect blank canvas for all the other table appointments. A black over sheer topper added the right dimension for a dynamic table setting. 
Antique glass candle holder with sterling silver overlay.
Square acrylic silver colored chargers set at a 90-degree angle to the table’s edge held white dinner plates trimmed in silver. Instead of putting the black napkins to the left of the plate, the customary place to find something to wipe your kisser, I folded the napkins into a simple rectangle and placed each between the dinner plate and charger, allowing about a third of the napkin to show.
Instead of a centerpiece, I opted for two tall crystal candlesticks with black rustic candles and two short porcelain candle holders with a silver overlay that also held matching black candles. Clear hurricane globes softened the flicker of the candle light. One of my guests brought us a beautiful hot pink Kalanchoe plant (in top picture) , adding just the right amount of pop to the monochromatic color scheme of the table.


Thursday, April 12, 2012

Beyond Easter '12 & Onto Spring

There comes a day after Easter that the bunnies go back into hiding 'til next year. So, how do you dress the table--in this case, my kitchen table.

My centerpiece consisted of flowers given to us by our guests at Easter dinner. The combination makes for a short-lived, but colorful centerpiece. 

Centerpiece flowers!


Individual place settings consisted of a lime green place mat appointed with a navy, gold & white dinner plate and coffee mug made by Fitz & Floyd, plus a four piece stainless silver plate place setting. All on atop of an aqua plaid topper.
Place setting!


Bird shaped clay votive candle holders mirror flower pot shaped napkin holders. 
The repetitive use of materials help unify a tablescape.


Friday, April 6, 2012

Blue, White & YOU--The Perfect Backdrop for a Wonderful Gluten Free Dinner

Just as wine is about friends, food & fun, so are holidays. This is doubly true when planning a meal around a special diet. Of our 14 friends who are joining us for Easter dinner two are vegetarian, one is vegan and my husband is severely gluten intolerant, thus the inspiration for my blog and most of what I do. There will be lots more about the actual meal in a later post.

I like to use a theme idea. This year I chose the theme "Blue, White & You". Even though we really enjoy casual gatherings, we wanted our friends to feel really special on this very special holiday. And, every special occasion begins with a fabulous tablescape. 

For our oak table for six, I chose a blue linen tablecloth and white place mats for the backdrop for our "Kathleen" Noritake china.  Dessert plates lined with a paper doily will catch the condensation from the water glasses--a trick I learned during my undergraduate vocational home economics studies at The University of Montevallo.  The taller wine glasses will not need an under plate.  (As a side note, my father made this table by hand soon after he and my mother were married in 1944).  Keep reading. Lots more details to come.


Place setting: A silver plate charger (a gift from my great aunts & uncles when I received my doctoral degree) cradles the dinner plate. A dinner fork is to the left and a knife is to the right. The fork at the top of the plate will be for dessert. 


Let's talk about napkins: I like to use two coordinating napkins--one for your lap and the other for you mouth. I laid the white napkin flat and then placed the blue one at a 90 degree angle. By pinching both in the center and bringing straight up, the eight points will form a "flower". Holding the pinched center in one hand, place the silver napkin ring down over the napkins about three inches. 


Centerpieces--the star of the table. Unless I am using silk arrangements, an interesting collection or clipping from my own yard , I prefer centerpieces that can have a future life. Here I chose a white hydrangea plant (that will be planted in my yard next week). I wrapped the pot with a folded blue table topper and set the whole thing in an antique crystal punch bowl. 


Now for the choice of candles: If you look back at the first picture, you will notice two set of candle sticks--a tall pair of crystal candle sticks that were home to two 7" white Root candles. At an angle at the base of each of these was a short Bavarian china candle holder. The hand painted sterling silver overlay makes gives this table that little extra touch to this table and held a 7" Root candle in the color Abyss.

Table for 8: I also carried out "Blue, White & You" theme on the table for my other eight guests. I chose a white linen and cotton blend table cloth. "Sylvia" china plates, another Noritake pattern were added. Again, dessert plates of the same pattern lined with a paper doily will catch the condensation from the water glasses and the taller wine will be just fine without a coaster.


Now about the place setting:  Navy satin striped place mats played host to square silver acrylic chargers that holds the dinner plate. 

Let's talk about the special touch. The arrangement of the napkins is the touch that made these place settings so special. I took two napkins, one white trimmed in lace and the other a matching navy satin striped, and laid the navy napkin on top of the white one and tied them a ribbon in the same color blue as one of the shades in the china. I placed each pair of napkins on the left side of the plate to show off the beautiful blue rose pattern.

Center stage: Again, I chose a live plant that will be give a special place in one of my flower beds after Easter. Pictured at left is a blue hydrangea in a silver double handled urn. 

And for the finale--candles: Needing two tall candle sticks in my chosen color scheme posed a tiny problem. So, I found a pair of inexpensive ones in an off-white. A couple of cans of spray paint, one a shade lighter than the other, did the trick and matched perfectly. The Root pillar candle pictured here is also in the color Abyss and the dinner tapers, also Root candles, are Periwinkle.


Friday, March 16, 2012

Time for Peter Cottontail?

Don't look now, but Easter is less than a month away. The time is now for getting my tables dressed for this special occasion. I began with my kitchen, drafting my wonderful hubby to help. My kitchen theme is Easter outdoors (even though the table is inside).  I will take you through step-by-step how I put this whimsical tablescape together.

Table set for four


Table is set with four custom-made place mat of felt trimmed with yellow. A floral napkin in colors that complement the colors in the plaid place mats.


Place mats


Here are the supplies you need to make the place mat:
  1. Felt in color of choices
  2. Trim of choice
  3. Felt rosette
  4. Glue gun
  5. Glue sticks
Here is what I did:
  1. Make a pattern in the shape and size that you want.
  2. Place pattern on felt.
  3. Outline pattern onto felt.
  4. Cut shape out.
  5. Glue trim with hot glue gun around edges of felt  place mat,
  6. Unique napkin ring holder


  7. Glue rosette in the center of place mat..
Napkin ring holder

Here are the supplies you need:
  1. Small flower pots
  2. White paint
  3. Chisel 
  4. Matching trim
  5. Rosette
  6. Glue gun
  7. Glue sticks
Here is what I did:
  1. Carefully chisel out the bottom of the flower pots.
  2. Spray with white paint; wiping off some to give pots a distressed appearance.
  3. Allow to dry.
  4. Glue matching trim around rim of flower pot,
  5. Glue matching rosette atop of glued trim.

Whimsical Wildlife Centerpiece
Whimsical wildlife center piece

 Here are the supplies you will need:

  1. Small bird cage
  2. Bag of Spanish moss
  3. Small ceramic bird
  4. Small bird's nest
  5. Small bird eggs
  6. Silk butterfly
  7. Glue gun
  8. Glue sticks
  9. Two ceramic "bird shaped" votive holders
  10. Two egg votive holders surrounded by small bird eggs,


Ceramic bird in a cage watches over her little nest.


A Williamsburg  blue tablecloth was the perfect backdrop for this whimsical setting. Stay tuned for more Easter tablescapes. Even if  someone has to be on a terribly restricted diet, the table setting can make up form what someone longing for that "something" in their diet.

Monday, March 5, 2012

Smoky Kale Chips

Look @ how beautiful & crispy! 
I enjoy surprising my quests with something a little off the beaten path. Smoky Kale Chips do just that. Here, I like the beautiful shades in the baked kale again the solid white of my serving dish against a purple backdrop & a floral napkin.

Here is my recipe:

8 large kale leaves
2 tablespoons olive oil, extra virgin
1/4 teaspoon salt
1 teaspoon smoked paprika

Here is how I made this:

1. Preheat oven to 350 degrees Fahrenheit. Line two baking sheets with parchment paper.

2. Wash and dry kale leaves; remove stems and tear into two to three inch pieces. Add olive oil; toss to coat thoroughly. Set aside.

3. Mix salt and smoky paprika. Sprinkle over olive oil coated kale. Toss thoroughly to evenly distribute paprika mixture over leaves.

4. Spread kale leaves out in a single layer on baking sheets.  Place in preheated oven. Bake for 14 to 16 minutes or until crispy.

5. To serve, place in decorative serving bowl.

Servings: 4 Yield: 2 cups

Oven Temperature: 350°F

Amount Per Serving
Calories Per Serving: 134.42

Author: Dr. Jacquelyn P. Horne
Copyright: 2012


Saturday, February 11, 2012

Citrus Fruit Cup with Rosemary Infused Syrup


This is an amazingly simple first course with an interesting twist of flavors. The really neat thing about this recipe is that it is naturally gluten free. See if  your sweetie can recognize the rosemary flavor.

I put this yummy first course in one of our stemmed, monogrammed wine glasses set against a red valentine doily against a white plate. 

Here is my recipe:

Citrus Fruit Cup
2 large navel oranges, peeled and sectioned with a knife
1 large grapefruit, peeled and sectioned with a knife
1 large lime, peeled and sectioned with a knife

Rosemary Infused Syrup
1 cup sugar
1/2 cup water
3 6-inch rosemary sprigs
4 maraschino cherries w stems

Here is what I did:

Citrus Fruit Cup:
1. Peel and section with a knife the oranges, the grapefruit and the lime, allowing juices to collect in bowl with fruit sections. Set aside.
2. When syrup is completely cool, pour over citrus sections and gently toss. Store in refrigerator over night.

Rosemary Infused Syrup:
Place water and sugar in small saucepan; bring water to a boil. Add rosemary and boil for 10 minutes. Remove from heal and allow to cool completely.

To Serve:
Divide citrus sections among four stemmed compotes. Spoon syrup over fruit sections. Garnish with a maraschino cherry.

Servings: 4

Total Time: 1 hour and 10 minutes

Calories Per Serving 288.72

Author: Dr. Jacquelyn P. Horne
Copyright: 2012

Wednesday, December 28, 2011

Our Christmas Dinner Tables--Seating for 18--Recipes to Come

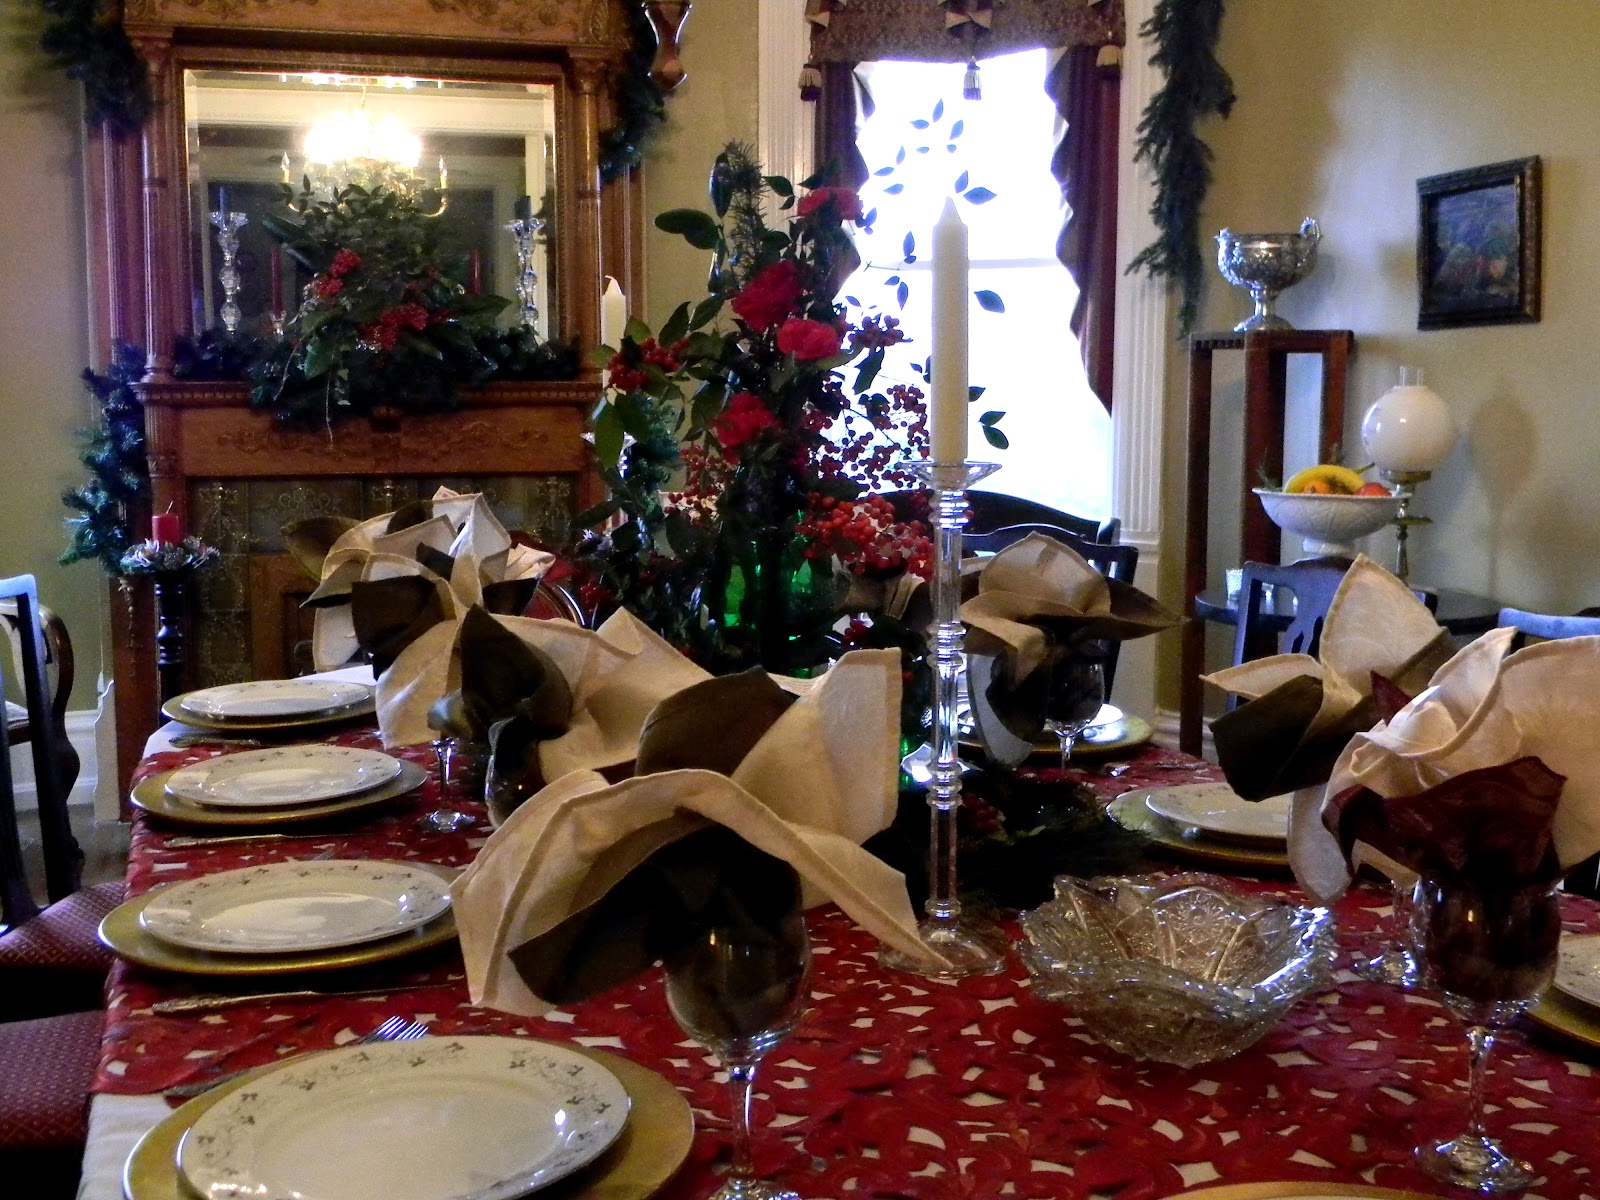
Wouldn't you just love to be invited to eat at one of these tables!


Like most holidays around our home when folks are invited, I set two dining tables for Christmas. I like lots of layers of fabrics on my tables, particularly for special occasions


This year I chose to use one white and one green tablecloth. Read on to learn how I made two dining tables compatible and inviting.

Because the dark hue of the tablecloth and the almost equally dark tone of the red chargers zapped much of the  the luster from the table, white Battenberg placemats turned sideways so that a few inches hung over the edge became the backdrop for each place setting.


Atop each white placemat was a charger and a dinner plate with a Christmas pattern. Each place setting was flanked by appropriate silverware and a wine goblet. Two single red candle sticks, each home to a white candle shielded by a hurricane globe and surrounded by a candle ring of poinsettias made for a dual centerpiece.


The other, larger table was dressed with a white linen and cotton blend tablecloth. A 72" red cutwork topper provided a show-stopping contrast. Gold chargers were hosts to tone-on-tone china dinner plate. The same as with the smaller table, each place setting was flanked by appropriate silverware and a wine goblet. A mirrored runner resting on two glass blocks made for an interesting two-level centerpiece. Silk greenery was placed under the runner to conceal the glass blocks. Vases of varying heights and shapes held live greenery, Nandina berries, holly and a few red carnations. White candles in tall lead crystal candle holders punctuated the table.


Everyone always asks "How do you create such a festive table?" The answer is simple: I use of two napkins for every place setting. For the darker table, I chose one white Battenberg and one red napkin. I placed both at right angle to one another, pinched in the middle and then tucked the center into the wine glass at each place setting.


For my other table, I chose a green to match the bows on the chandelier and a slightly off-white napkin. 

Become Friends on Facebook


Join my Circle on Google+

Thursday, December 15, 2011

Creole Veggie Dip


On aluminum tray on right side.
2 cups small curd cottage cheese
1 2/3 cups sour cream
2-3 tablespoons Creole seasoning
1 tablespoon Worcestershire sauce
1 teaspoon lemon juice
1 teaspoon salt
green onions or chives, finely chopped
raw vegetables

Place cottage cheese in bowl of food processor. Process until smooth. Add sour cream, Creole seasoning, Worcestershire sauce, lemon juice and salt. Process until thoroughly blended. To serve, place dip small bowl and garish with finely chopped green or chives. and arrange a variety of raw vegetables cut into bite sized pieces around bowl of dip.

Yield: About 4 cups

Author’s notes:
1. Control the degree of spiciness with the amount of Creole seasoning added.
2. Be creative with dip container. Use a hollowed our bell pepper of any color or a polished red onion with center removed to within ¼” of onion wall.


Become a fan on Facebook


Join my circle on Google+

Sunday, December 11, 2011

It's Christmas Party Time


How would you like to have been a guest invited at this gluten free spread?

Between 50 and 60 folks enjoyed an evening of good food, good conversation and good wine. Did they know they were eating gluten free? Most of them did not.


Here's How I Put Our Christmas Party Together:
  • I began with a pristine white tablecloth of linen and  cotton. 
  • Using glass blocks as risers, I designed an interesting display of varying heights for platters and serving pieces.
  • I used a cranberry colored synthetic blend tablecloth to cover the glass risers.
  • Two 3-foot candle holders, which was home to two 3-inch column candles carried the eye upward for a BIG impact.


What's Were Those Yummies on the Table?
Smoked Salmon Spread
(Proprietary Recipe)

Pimento-Olive Cheese Loaf

World's Best Chicken Salad Served on Rice Wafers
(Proprietary Recipe)

Creole Veggie Dip with Veggie Dippers (Recipe)

Creamy Artichoke Caesar Dip
with Against the Grain Toasted Baguettes


Date-Nut Meringue Balls (Recipe)

Mocha-Chocolate Fondue with Marshmallows

Light Fruit & Cheese Tray with 
Maple Infused Fruit Dip (Recipe)

Mints

Toasted Mixed Nuts

Hot Cider

Artisan Wine


WOW!!!!! Lighted Fruit & Cheese Tray


Wednesday, October 12, 2011

Fall Change of Pace

New leaf placemats made from felt plus a potted mum and two little bouquets transform a basic table setting into a fall masterpiece in just a couple of minutes.

Tuesday, September 20, 2011

Handmade Western Napkin Rings

Eating Gluten FreeCustomizing napkin rings to fit your theme is so simple, requiring a few simple items from your local craft store and just a little imagination. I needed napkin rings to fit my western theme for the Delphi Study Club meeting that I was hosting.
 
Supplies needed:
1. Jute string
2. Wooden figures (I chose horse shoes, sheriff's badges, and horses)
3. Spray paint
4. Felt tip pen
5. Hot glue gun
6. Hot glue


Here's how: 1. Spray paint wooden figures.
2. Using a felt tip pen, add detail to your painted figures.
3. Place a dot of hot glue on each side of the back of the painted figures.
4. Place the center of a 12" piece of jute string across and gently press string into glue.
5. Allow glue to dry.
6. Roll napkins.
7. Position figure on front of napkin and tie ends of string in a bow for easy removal.
8. Here, I arranged all my napkins in a woven wooden basket to further carry out the western theme.

Sunday, September 18, 2011

Delphi Study Club Tablescape


Theme for the September meeting of the Delphi Study Club was western. Betsy Blake, a very close friend and study club member was to present the program. "If" was the subject--"if" you could be anyone who lived at any time in history, who would you be? Betsy was going to be a saloon girl from the days of the Wild West. Sadly, Betsy left us way too early on June 26, 2011 in her sleep.

Purple was her favorite color, thus many of us wore purple for the meeting in her honor. As hostess (and friend), I embellished the theme with a western tablescape, including handmade western napkin rings (please see next post).

For the tablescape, a piece of denim became the backdrop for a bordered table topper in muted shades of blue, pewter and, guess what--purple. A decorative cowboy boot became home to the centerpiece, and mini "bushel" baskets became home to fruits and vegetables that may have been used in early western kitchens to feed folks on the trail and stopping in to stay the night.

Variations in heights make for a more interesting buffet table. Risers in a number of different heights were placed under the fabric to give lift to the various elements and dishes on the table.

Friday, September 9, 2011

Fall Decorating Made Easy


Decorating your home for fall adds a sense of coziness as well as beauty and tells your family that you love them. But, decorating doesn't have to be expensive or complicated. Here are a few tips that I have found to work, especially when short on time.

  •  Use placemats, napkins & napkin rings you already have.
  • Don't be afraid to mix & match. Variety provides for interest.
  • Flowers add a festive touch, & one bunch can go a long way.


Here is a list of supplies for the tablescape you see here:


1. 1 round black tablecloth (black makes a great backdrop for almost any color scheme
2. 4 linen blend placemats & matching napkins
3. 4 linen napkins with leaf motifs embroidered on the corners
4. 4 silk napkin rings
5. 4 rattan plate chargers
6. 3 vases in different sizes
7. 1 bouquet (picked up at the check out at the grocery store for about $5)

The result: One welcoming fall table!


Monday, August 29, 2011

Tailgating in My Kitchen


(Excerpt: From My Kitchen, The Auburn Villager, September 1, 2011)

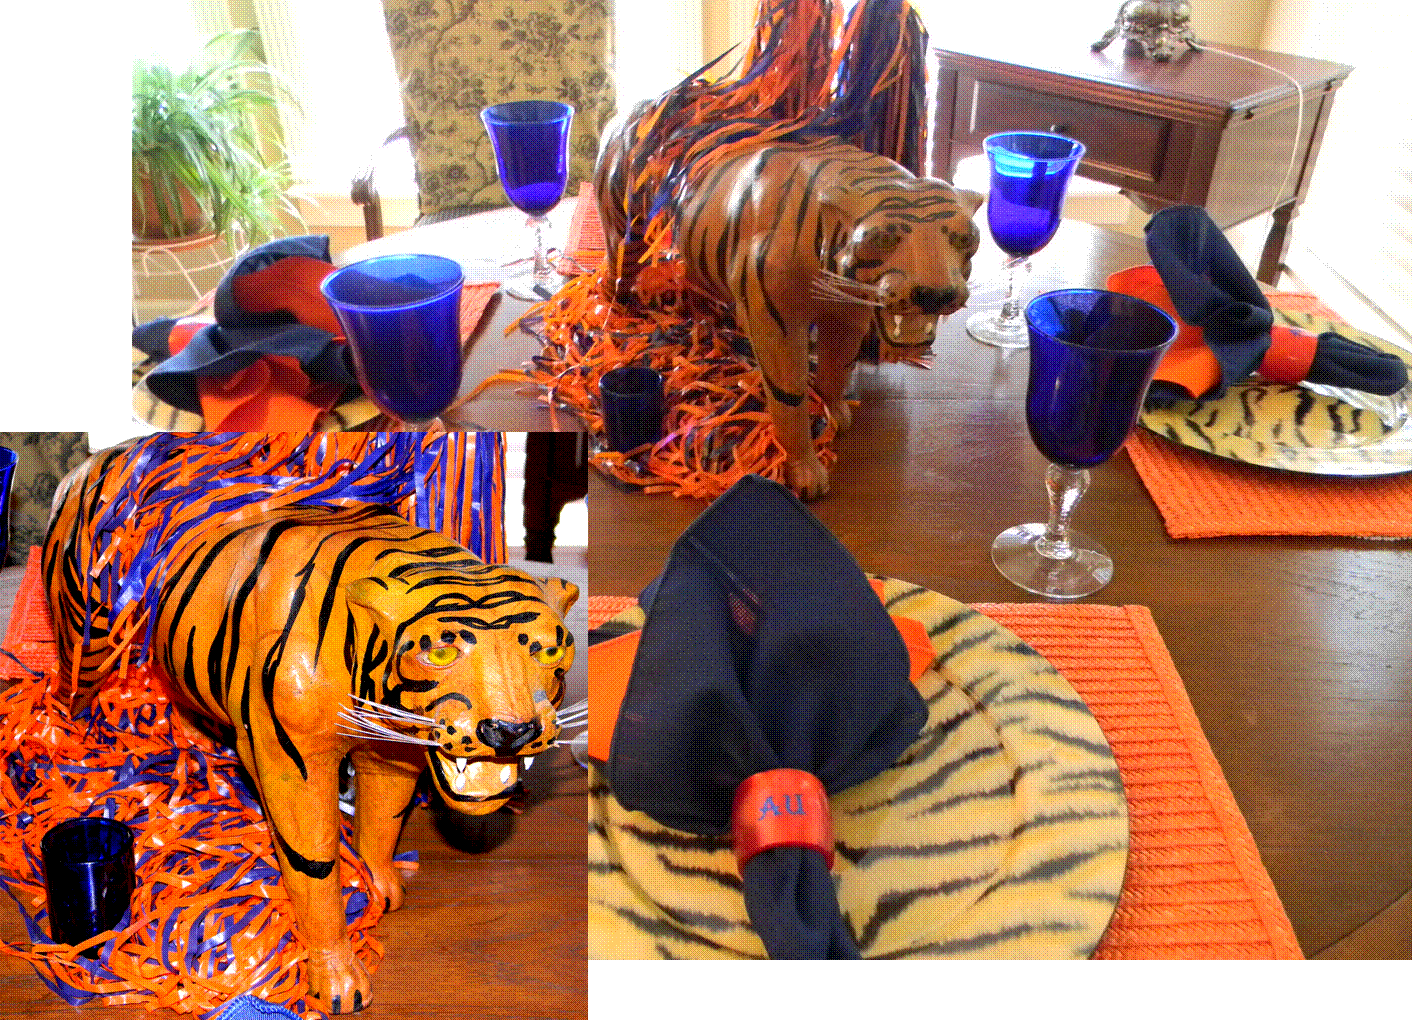
"Tailgating doesn't have to be limited to the stadium or even watching the game at home. Once in a while, we find it just plain old fun to do something whimsical for our every day meals, which is exactly what I did. Our kitchen table is now all decked out in the Auburn tradition. A leather tiger tangled in pom poms form the centerpiece. Orange placemats with orange and blue napkins secured by customized napkin rings sporting glittery letters of “AU” leaves no doubt who we will be pulling for this season. Tiger chargers serve as place holders for good things to come. And, blue stemware round out the four place settings at my kitchen table."

Customized Collegiate Napkin Rings

Simple napkin rings can become works of art to support your favorite team. You can spell out the entire name of the school. Because I am a retired Auburn University professor, of course I chose to use the initials for Auburn University as well as Auburn's orange and blue.

And, here’s how!

Items You Will Need:
1. Napkin rings in one your school’s colors.
2. Glitter stick on letters in your school’s other color. These can be purchased at your local craft store.
3. Wipe napkin ring with dry clean cloth.
4. Gently remove letters, one at a time, and position in the center.


Carry the theme one step further by using napkins in both colors of your school. Here’s how:

1. Lay the napkin that is the same color as the ring down flat.
2. Lay the napkin that is in the second color down on top of the first at a one-quarter turn, making sure the center of the two napkins are on top of one another.
3. Pinch in the center and bring straight up to form a fabric “flower”.
4. Place in napkin ring.


I used four "tiger" chargers atop of orange straw place mats to complete my theme! War-r-r-r Eagle!