Showing posts with label Appetizer. Show all posts
Showing posts with label Appetizer. Show all posts
Sunday, October 20, 2013


Thursday, October 17, 2013
Hot Crab Dip (Adapted from Hannah Flanagan’s Irish Pub)

This is probably the most
successful as well as the most requested dip I make. Seldom is any left. I
especially like to serve this elegant dip during the cooler season of the year.
Warm on the inside is just plain better when the cooler winds of winter blow.
As elegant as it is
delicious, my Hot Crab Dip (recipe
follows) makes a real statement at holiday gatherings, or at anytime I want to
impress my guests. Just be sure none of your guests have a shellfish allergy.
That is a big oops! No one wants to drag out their Epipen.
Friday, September 20, 2013
Open Faced Mini Muffulettas
Finger foods are a natural for any party, get together, tailgating and the list goes on and on. One that we liked a lot with heavier wines from our the days of our wine tasting parties at The Brass Brassiere was our "Open Faced Mini Muffulettas". The flavors are heavy enough for more robust wine. Here's to you!
Herbed Goat Cheese and Prosciutto Shrimp
During the years we owned a wine, gift and antique shop named The Brass Brassiere, we hosted somewhere between one and four wine tastings per month. Do I need to point out we were busy?
One thing we learned early on was that shellfish lends itself perfectly to lighter bodied white wines. Since I had the responsibility for selecting and preparing the appetizers, I was constantly on the lookout for quick and easy appetizers. During the latter part of our tenure as shop owners, I also sought nibbles that were naturally gluten free.
This appetizer was one of our patrons' favorites, thus there would never be a shrimp left. When serving shellfish, you always need a back up appetizer for those with shellfish allergies.
Monday, September 2, 2013
Cranberry-Nut Tassies

1/2 cup butter (no substitutes), softened
1 3-ounce package cream cheese, softened to room temperature
1 cup Jackie's Quick Bread Flour Blend (Recipe)
1 egg
3/4 cup brown sugar firmly packed
1 tablespoon butter (no substitutes), melted
1 teaspoon vanilla
1# cup fresh cranberries, finely chopped
3 tablespoons walnuts, finely chopped
1. Preheat oven to 325 degrees Fahrenheit.
2. Place 1/2 cup butter and cream cheese in a small mixing bowl and beat until thoroughly using an electric mixer. Stir in flour mixture. Cover and chill approximately 1 hour or until dough is each to handle.
3. While dough is chilling, place egg, brown sugar, 1 tablespoon of melted butter and vanilla in a medium mixing bowl. Mix to combine thoroughly. Stir in chopped cranberries and walnuts.
4. Remove dough from refrigerator, and working quickly, shape dough into 1-inch balls. Using a tempered tassie tamper, press dough into the bottom and up the the sides of mini muffin cups. Fill each with 1-2 teaspoons of cranberry-nut filling.
5. Place in a preheat oven and bake for 25 to 30 minutes or until filling is firm. Remove tassies from pans and cool completely on cooling racks.
Servings: 36
Recipe Type: Appetizer, Brunch, Cakes, Pastries, and Desserts, Dessert, Gluten Free, Holiday
Author: Dr. Jacquelyn P. Horne
Copyright: 2013
Thursday, August 8, 2013
Bacon Topped Cheese Ball

We all have a few try-and-true recipes we break out for every party. Folks come to look forward to enjoying these few nibbles a when invited to one of our gatherings. Bacon Topped Cheese Ball (recipe follows) is one of those dishes. i have never had this one to fail.
I often like to plan two or three smaller get-togethers close together. When I do that, instead of making one large cheese ball or log as you see in the picture above, I divide the mixture into two smaller ones. I never fail to get loads of compliments and requests for the recipe. Just be sure
to have a variety of gluten free crackers or gluten free toasted baguettes available and watch this one disappear.
Oh, did I tell you this recipe is naturally gluten free? It is, so there is no trying to figure out substitutions. Just enjoy a carefree evening with your guests.
Here is my recipe:
8 ounces cream cheese,
softened to room temperature
1/2 cup sour cream
4 cups shredded cheese blend
3 tablespoons onion flakes
3 tablespoons sweet pickle
relish
1 tablespoon horseradish
1/2 teaspoon lemon-herb
seasoning
6 slices bacon, fried crisp
& finely crumbled
1/4 cup almonds, toasted and
finely chopped
1 sprig fresh curly leaf
parsley
1 tablespoon slivered
almonds, lightly toasted
1/4 cup dried parsley
Here is I put this recipe together:
1. In the mixing bowl of an
electric mixer, combine cream cheese and sour cream. Using the dough hook
attachment beat cream cheese and sour cream until well blended. Add shredded
cheese, onion, relish, horseradish, and garlic salt. Mix thoroughly. When
mixture begins to form a ball, remove from mixing bowl and place on piece of
plastic wrap. Using the plastic wrap, shape mixture into a ball. Cover and
chill.
2. Thoroughly combine bacon,
parsley and almonds. Roll cheese ball in bacon mixture. Store in tightly
covered container in refrigerator until ready to serve.
3. Garnish with parsley and
sliced almonds, if desired. Served with assorted gluten free crackers or
baguettes.
Author’s Note: Will keep in refrigerator
up to three days or will keep in freezer up to two months.
Servings: 16 Yield: 1 8-inch cheese ball
Preparation Time: 45 minutes
Inactive Time: 1 hour
Total Time: 1 hour and 45
minutes
Nutrition (per serving): 222
calories, 168 calories from fat, 19 g total fat, 44.5 mg cholesterol, 390.6 mg
sodium, 125.6 mg potassium, 4.2 g carbohydrates, 1 g fiber, 2.2 g sugar, 9.5 g
protein.
Author: Dr. Jacquelyn P.
Horne
Copyright: 2013
Wednesday, August 7, 2013
Creole Veggie Dip
Feel free to adjust the amount of Creole
seasoning to fit your taste buds. Be sure to have lots to drink on hand as this
one tends to make folks thirsty. This was always a personal favorite because it
is just so easy, and this was the one exception when I would purchase precut
veggies so that start to finish was less than 10 minutes. Just throw into a
cooler packed with ice, and you are good to go.
Tuesday, July 23, 2013
Lamb Burgers

All flavorful; all nutritious; all good for you; and, all gluten free! Just look at how amazing this summertime plate looks! Here this burger is served with my Lemon Herb Mayo Spread (click for recipe).
Turkey-Lamb Cocktail Meatballs

Meatballs are easy and quick for an appetizer in minutes, but are so over worked they are boring. Still wanting something I could make ahead of time, freeze and then just thaw, heat and serve, I put on my thinking cap. Plundering through my freezer, I found packages of each of these three meats. With a couple of suggestions from perusing other recipes, this is result of just a little creativity. Here, I topped each meatball with Fresh Buttermilk and Sour Cream Salsa (click here for recipe).
Fresh Buttermilk and Sour Cream Salsa
Nothing says summer more than cold buttermilk and cucumber. This salsa is just a little off the beaten path, but is so light and refreshing--the perfect condiment for my Turkey-Lamb Cocktail Meatballs (click for recipe).
Monday, May 20, 2013
Devilled Eggs Stuffed with Smoked Salmon

Later as a vocational home
economics teacher, I had to practice what I preached which meant that I had to
eat what I was teaching including eggs during the unit called “The Incredible Edible
Egg”, a familiar slogan developed by the American Egg Board who also was kind
enough to provided us with a kit chocked full of good information.
No one food has it all,
including eggs, but eggs are naturally gluten free which is a good thing for Celiacs
and those with non-celiac gluten intolerance. The bad news is eggs—when looking
at both yolks and whites—are high in saturated fats and cholesterol. The good
news is that they are a very good source of riboflavorin, vitamin B12 and
phosphorus, protein and selenium.
Any you know what? If you eat
only the egg white, you are eating a food that has no cholesterol and no saturated
fat, making my Devilled Eggs Stuffed with
Smoked Salmon (recipe follows) a wonderful choice for those who are gluten
free. Because this recipe only uses the white of the egg, this recipe Actually,
this dish is kind to folks with have to multiple food allergies such those who need
to avoid corn, soy, and nuts of all kinds. To be honest, this one is so yummy
you will want to find all kinds of ways to incorporate these babies into
everyday meals.
Tuesday, April 16, 2013
Creole Roasted Shrimp with Lemon-Dill-Mayo Dipping Sauce

Don't you wish you could have been at my party? I just fell in love with this recipe. I have made it three
times, tweaking it just a little more each time, so you may be seeing this one
again down the road.
When you combine lemon, dill and
mayonnaise, this sauce would make shoe leather taste good. During the process
of perfecting this recipe, I also learned a new way to cook shrimp—roasting. I
may never boil or grill shrimp again. Roasting these babies in the oven is oh
so easy. If you line your baking sheet with parchment paper, cleanup is a
breeze. The only little biddy baby problem I had was making sure I did not over
cook them. If you do, you will think you are chewing on pencil erasers. You
need to hang out by the oven with a watchful eye while the shrimp are cooking. I
like to serve these as an appetizer, but if you drizzle the sauce over the
shrimp and place on a bed of rice, all of a sudden you have an entrée.
Here is my recipe and how I put this one together:
Saturday, January 12, 2013
Valentine Cornmeal Cookies

Love is in the air with the day made for love just around the corner. What do you mean you have no idea of what I am talking? None other than Valentines Day! I perfected this little sweet treat for those of you who are gluten free or have a friend or family member who is. These cookies have the same festive feeling as those gluten laden cookies that are so common in grocery store bakery departments this time of the year, only with more texture and flavor.
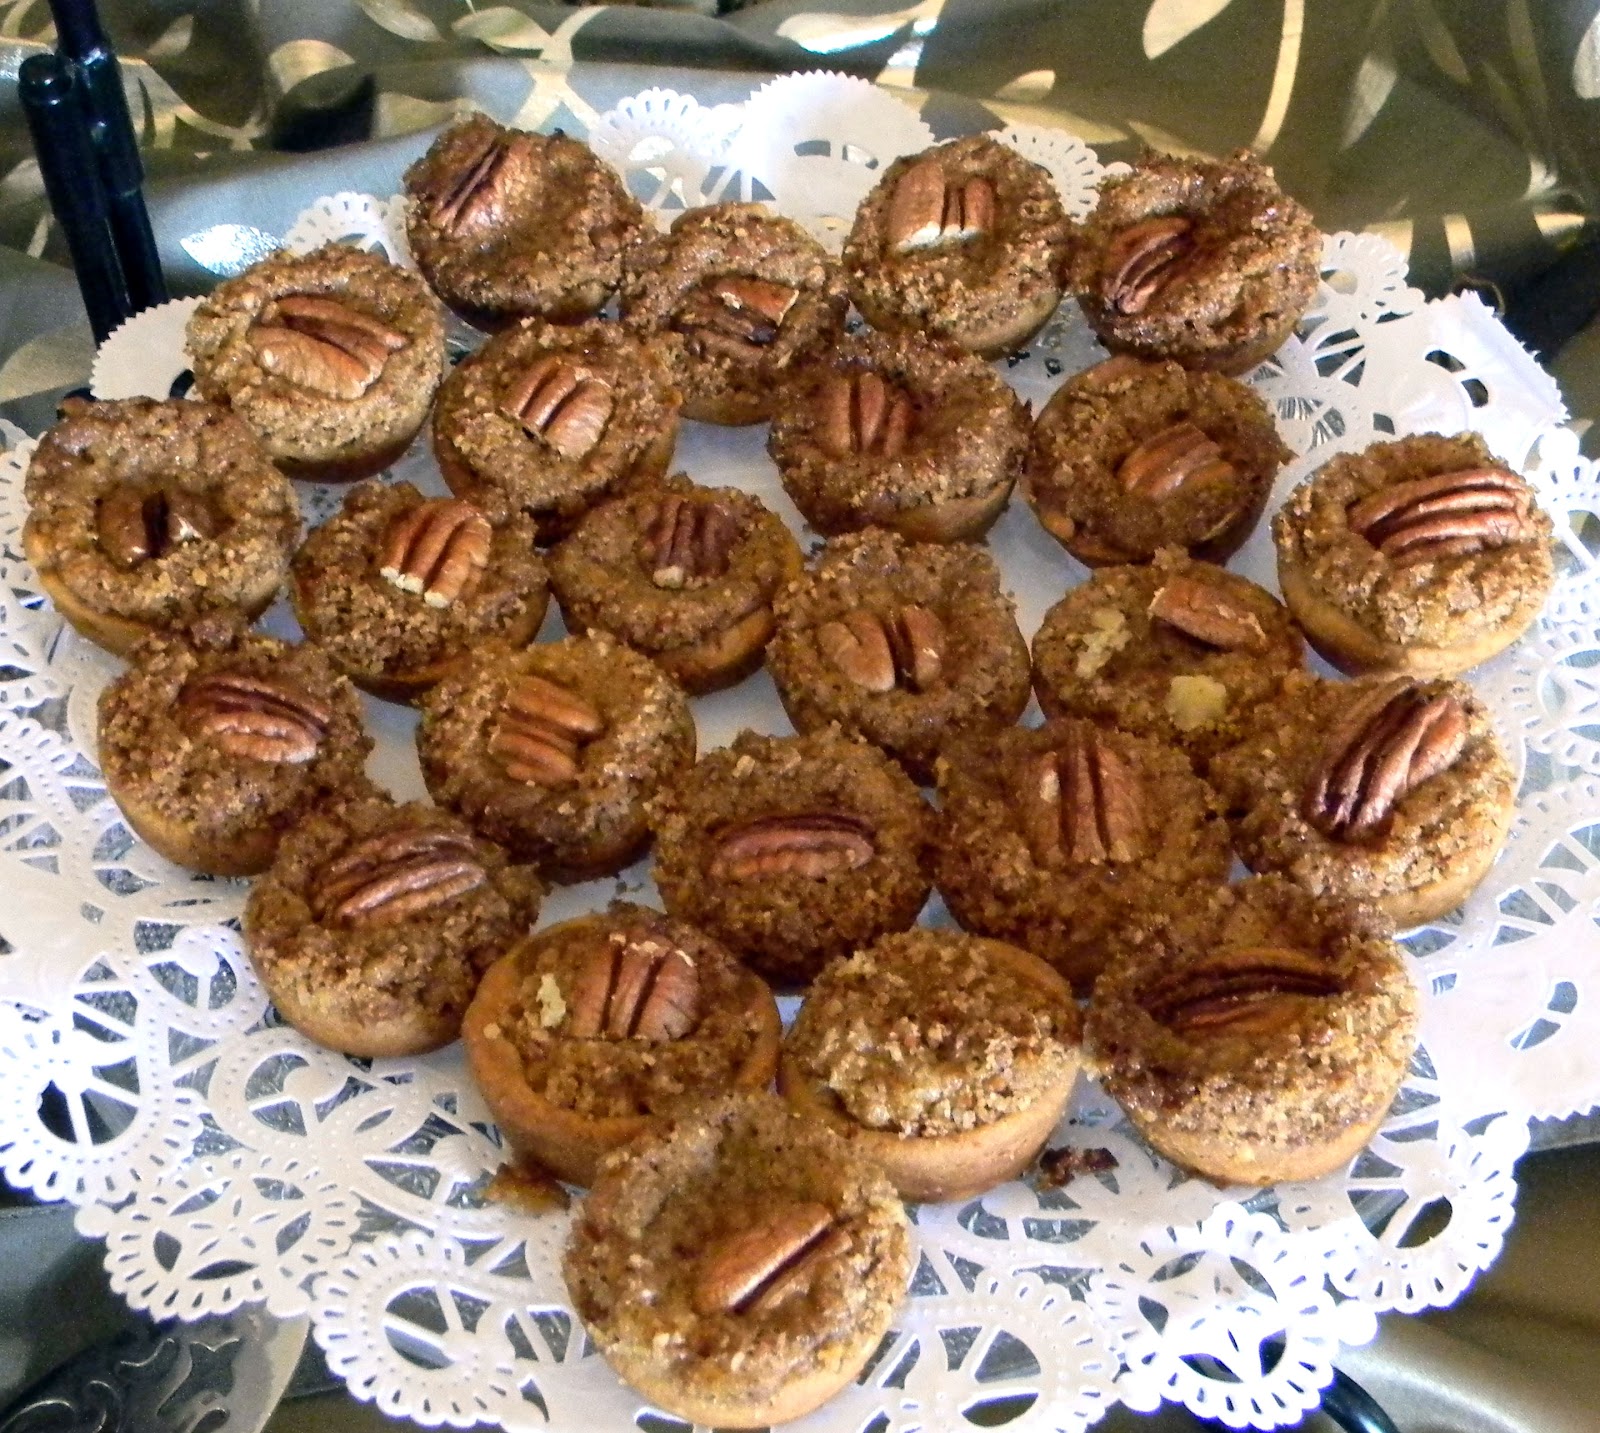
Monday, December 31, 2012
Southern Pecan Tassies

Tassies of all types are synonymous with holidays in the south. I typically have from one to four different types for all my parties, teas, etc. What I like about tassies is that they can be prepared and frozen for up to two months ahead of time. I know that these are not stellar for nutrition, but are super starts for a terrific sweet finger food.
Crust:
1/2 cup butter (no substitutes), softened
1 3-ounce package cream cheese, softened to room temperature
1. Place 1/2 cup butter and cream cheese in a small mixing bowl and beat until thoroughly using an electric mixer. Stir in flour mixture. Cover and chill approximately 1 hour or until dough is each to handle.
2. Roll dough into approximately 1-inch balls; place one in each well of two 12-cup mini-muffin tins.
Filling:
2/3 can corn syrup
2 Tablespoons butter (no substitutes), melted
1 pinch salt
2 medium eggs
1/2 cup sugar
1 teaspoon vanilla extract
1 cup pecans, finely chopped
1. Preheat oven to 300 degrees Fahrenheit.
2. In large mixing bowl, mix corn syrup, butter, salt, eggs,
sugar, vanilla and pecans. Spoon into dough lined muffin tins. Place in
preheated oven; bake for 25-30 minutes or until golden brown and completely set
in the center.
3. Allow to cool slightly before running a thin spatula
around the rim of each tassie. Remove from muffin tin cups and place on cooling
rack until completely cool. Place in airtight container at room temperature
until ready to serve, up to three days.
Servings: 48
Oven Temperature: 300°F
Preparation Time: 30 minutes
Cooking Time: 30 minutes
Inactive Time: 1 hour and 30 minutes
Total Time: 2 hours and 30 minutes
Dietary Analysis:
·
Items highlighted in yellow should be taken into careful
consideration when looking at total food intake for the day.
·
Items highlighted in green are indicate a low value when
considering total food intake for the day.
Percent daily values based on the Reference Daily Intake (RDI) for a 2000 calorie diet. Nutrition information calculated from recipe ingredients.
Amount Per Serving
Calories 78.78
Calories From Fat (65%) 51.23
% Daily Value
Total Fat 5.89g 9%
Saturated Fat 2.65g 13%
Cholesterol 18.49mg 6%
Sodium 27.97mg 1%
Potassium 19.85mg <1 o:p="o:p">
Total Carbohydrates 6.37g 2%
Fiber 0.25g 1%
Sugar 3.63g
Protein 0.77g 2%
Fiber 0.25g 1%
Copper 0.03mg 2%
Energy 329.62
Glucose 0.01g
Iron 0.11mg <1 o:p="o:p">
Lactose 0.16g
Lysine 0.05g
Magnesium 3.52mg <1 o:p="o:p">
Manganese 0.1mg 5%
Net Carbohydrates 6.12g
Phosphorus 15.76mg 2%
Riboflavin 0.02mg 1%
Selenium 0.84mcg 1%
Thiamin 0.02mg 1%
Vitamin A 149.96IU 3%
Vitamin B12 0.03mcg <1 o:p="o:p">
Vitamin B6 0.01mg <1 o:p="o:p">
Vitamin C 0.02mg <1 o:p="o:p">
Vitamin D 4.49IU 1%
Vitamin E 0.13mg 1%
Vitamin K 0.43mcg <1 o:p="o:p">
Zinc 0.17mg 1%
Author: Dr.
Jacquelyn P. Horne
Copyright: 2011
Tuesday, December 4, 2012
Holiday Party Mix

Thus is an adaptation of old
favorite, Holiday Party Mix (recipe follows), which is really just a dressed up version of the traditional party mix I served at parties years
back. I had to remove a couple of ingredients from the original because of the
gluten. But, you know what? My version is even tastier than the original, and I
know that you will just fall in love with this holiday treat that will keep for
up to a week at room temperature if stored in an airtight container.
Thursday, October 18, 2012
Bacon Topped Cheese Log

Here is another party food for you from my party last week! This is super simple to make and will keep beautiful up to three days ahead. Now that my kind of party food!
1/2 cup sour cream
4 cups three cheese blend
3 tablespoons sweet onion, finely chopped
3 tablespoons sweet pickle relish
1 tablespoon prepared horseradish
1/4 teaspoon salt
1/4 teaspoon dried orange zest
1/8 teaspoon garlic powder
3/4 cup bacon pieces, finely crumbled
1/2 cup dried parsley flakes
1/4 cup toasted almonds, finely chopped
1. In the bowl of an electric mixer, combine cream cheese and sour cream. Using the dough hook attachment beat cream cheese and sour cream until well blended. Add shredded cheese, onion, relish, horseradish, salt, orange zest, and garlic powder. Mix thoroughly. When mixture begins to form a ball, remove from mixing bowl and place on piece of plastic wrap. Using the plastic wrap, shape mixture into a log. Cover and chill approximately four hours until very cold to make handling easier..
2. Thoroughly combine bacon, parsley and almonds. Roll cheese log in bacon mixture. Store in tightly covered container in refrigerator until ready to serve.
3. Garnish with parsley and sliced almonds, if desired. Served with assorted gluten free crackers.
Servings: 20
Preparation Time: 30 minutes
Inactive Time: 4 hours
Total Time: 4 hours and 30 minutes
Calories Per Serving: 128.91
Author: Dr. Jacquelyn P. Horne
Copyright: 2012
Pumpkin Pecan Tassies
Tassies of all kinds are synonymous with holiday and party gatherings. This is my latest creation that I served to a group of ladies. And of course, I converted the recipe to gluten free.
Unfortunately, these babies are not low cal and are fat laden. I justify eating these because the pumpkin is high in antioxidants. Does the good outweigh the bad? Well, probably not, but the taste definitely does.
Here is my recipe and what I did:
Crust
1/2 cup butter (no substitutes), softened to room temperature3 ounces cream cheese, softened to room temperature
1 cup Jackie's Quick Bread Flour Blend (Click for recipe)
1. Preheat oven to 325 degrees Fahrenheit.
2. Place butter and cream cheese in a small mixing bowl. Using an electric hand mixer, beat until creamy. Add flour in 1/4 cup increments, Beat until all flour is incorporated and mixture is smooth.
3. Divide dough into 24 equal balls. Drop one into each cup of a 24-cup mini muffin tin sprayed very lightly with non-stick cooking spray. Using a tempered tassie tamper, press dough into the bottom and up the sides of the treated muffin cups.
4. Place in preheated oven; bake for 8 to 12 minutes or until edges are lightly browned.
Author's Note: I keep my tassie tampers in olive oil that I change ever couple of weeks. (Canola oil would work equally well.) Have a well oil tamper helps prevent the dough from sticking to the tamper. I also dip my tamper in oil and then blot with a paper towel after tamping the dough of two to three tassies. This method is so-o-o much faster and easier than using your fingers.
Filling
3/4 cup packed brown sugar, divided1/4 cup canned pumpkin
5 1/3 tablespoons butter, melted and divided
1 egg yolk
1 tablespoon heavy (whipping) cream
1 teaspoon vanilla extract
1/4 teaspoon rum extract
1/4 teaspoon ground cinnamon
1/8 teaspoon ground nutmeg
1/2 cup chopped pecans
2 tablespoons pecan pieces
1. While the tassie crusts bake, place 1/2 cup brown sugar, pumpkin, 4 teaspoons melted butter, egg yolk, heavy cream, extracts and spices in a medium mixing bowl. Using an electric hand mixer, mix until thoroughly combined. Spoon into muffin crusts.
2. In separate bowl, combine pecans and remaining brown sugar and butter. sprinkle over filling. Add 1 pecan piece in center of each tassie.
3. Bake for 23 to 27 minutes or until set and the edges are golden brown. Remove from oven and place muffin tin on cooling rack. Cool for 10 minutes before removing from pan.
Servings: 12 Yield: 2 dozen
Preparation Time: 30 minutes
Cooking Time: 30 minutes
Inactive Time: 10 minutes
Total Time: 1 hour and 10 minutes
Calories Per Serving: 245.35
Author: Dr. Jacquelyn P. Horne
Copyright: 2012
Monday, September 24, 2012
Hot Spinach Artichoke Dip with Cheese & Bacon Topping


Here is my recipe:
1 cup four cheese blend, softened to room temperature
1/2 cup bacon pieces, finely crumbled
12 ounces frozen spinach, thawed & squeezed dry
1 can artichoke hearts, drained & quartered
1/2 cup mayonnaise
1/2 cup sour cream
1 cup Parmesan cheese freshly grated
1 teaspoon salt
1/2 teaspoon red pepper flakes
Here is how I did this:
1. Preheat oven to 350 degrees Fahrenheit. Spray a 1 1/2 quart baking dish with gluten free non-stick cooking spray.
1. Preheat oven to 350 degrees Fahrenheit. Spray a 1 1/2 quart baking dish with gluten free non-stick cooking spray.
2. Place four cheese blend and
bacon pieces in small mixing bowl; stir to combine and set aside.
3. Place all ingredients into
bowl of a food processor. Processor on high until mixture is the desired thickness.
(I process the mixture to a creamy consistency so that the dip will spread
easily.)
4. Pour processed mixture into
prepared baking dish; use the back of a wooden spoon to smooth the top.
Sprinkle cheese/bacon mixture evenly over the top.
5. Place filled baking dish in
the center of a baking sheet and place in preheated oven. Bake for 30 minutes.
Serve with gluten free crackers, corn chips or bagels.
Servings: 16
Yield: 3 cups
Amount Per Serving
Calories 309.96
Author: Dr. Jacquelyn P. Horne
Copyright: 2012
Friday, September 21, 2012
Mini Spinach Frittatas
I have served these at many, many events from wine tastings, to showers of all kinds, to Christmas parties and most recently at a breakfast event. These are quick, easy and best of all gluten free. These can be made the day before, refrigerated in an airtight container and then reheated in the microwave without damaging the quality.
Here is my recipe:
Here is how I did this:
Here is my recipe:
1 cup ricotta cheese
¾ cup Parmesan cheese, grated
2/3 cup mushrooms, finely chopped
1 10-ounce package frozen spinach, thawed and squeezed dry
1 egg, slightly whipped
½ teaspoon dried oregano
¼ teaspoon salt
24 slices pepperoni
Fresh oregano sprigs
Here is how I did this:
1. Preheat
oven to 375°.
2. Combine
ricotta cheese, Parmesan cheese, mushrooms, spinach, egg, oregano and salt; set
aside.
3. Spray
24 miniature muffin cups with nonstick cooking spray. Place one slice of
pepperoni into the bottom of each muffin cup. Fill each muffin cup
three-fourths full with cheese mixture.
4. Bake
for 20-25 minutes or until a toothpick inserted into the middle comes out
clean. To remove frittatas from muffin tins, carefully run knife blade around
edges of muffin cup to loosen. Serve warm with sprigs of fresh oregano.
Yield: 24 mini frittatas
Wednesday, August 8, 2012
Stuffed Endive Salad
 |
| Stuffed Endive Salad A quick, easy little side salad is a dresses up any meal. I have used this one as a side dish and as an appetizer for folks to munch on while all guests are arriving. This is one of those little dishes that is only too easy to make, but that looks absolutely over-the-top! Did I mention that it is also delicious? Let me tell you; it is!!! |
1/3 cup pecan pieces, toasted
2 tablespoons honey, divided
1/4 cup balsamic vinegar
3 tablespoons orange juice
2 heads Belgian lettuce
1/3 cup goat cheese, broken into small pieces
1/4 cup dried cranberries, currants or raisins
1. Preheat oven to 350 degrees Fahrenheit.
2. Line baking sheet with parchment paper; set aside.
3. Combine pecans and 1 tablespoon of honey in small mixing
bowl; toss to coat. Spread coated pecan pieces on prepared baking sheet. Place
in preheated oven and bake for 8 to 10 minutes, stirring half way, until brown
and fragrant.
4. In small saucepan, combine remaining 1 tablespoon honey,
vinegar and orange juice. Place pan over medium-high heat. Bring to a boil ;
cook until mixture is reduced to desired consistency, approximately 3 to 5
minutes.
5. Separate Belgian lettuce heads into individual leaves.
Wash thoroughly and allow to dry completely. Fill each leaf with 1 teaspoon
cheese,1 teaspoon pecans and 1 teaspoon dried cranberries. Drizzle with vinegar
mixture.
Servings: 8 Yield: 14 - 16 individual leaves
Calories Per Serving: 146.5
Author: Dr. Jacquelyn P. Horne
Subscribe to:
Comments (Atom)